Tandoori Chicken

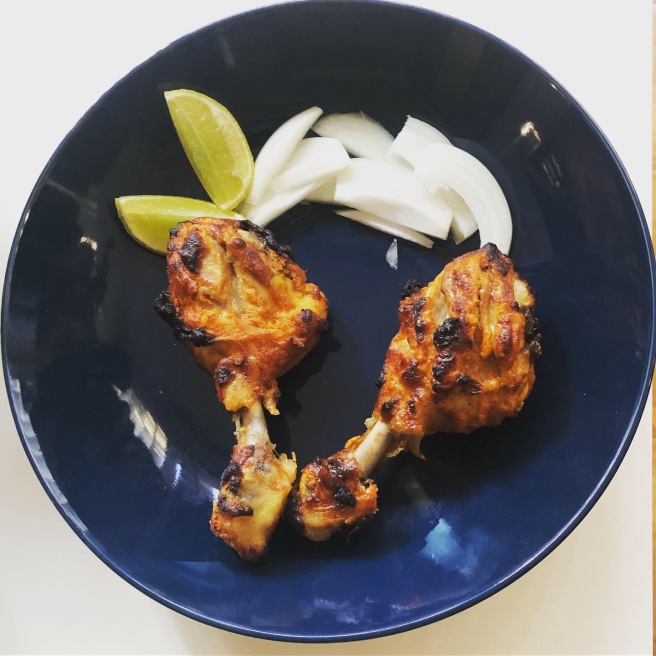
Hola a todos!!! I know this is every non vegetarians favourite starter, but in my house it usually goes in as the main course. Yes, we do have only tandoori chicken sometimes as our meal. Its a very easy to go recipe and fool proof too. any one can try it either in the OTG or in the barbecue stove.

Here I go and explain how to make a tandoori chicken turn into a main course with flat breads which we can either prepare in home or the store bought Lebanese bread which Š loves to pair with. Take a flat bread or any kind of bread you like, just spread the plain mayo or garlic mayo and stuff it with the pieces of the tandoori chicken. add some lettuce if you like to have, thats it. It will be a yummy brunch or a go to dinner in the house.

06D98084-27FF-4020-9DC9-7F03E337D7B6

Lets jump on to the ingredients to make tandoori chicken which needs to be marinated. A lot of people tell that the taste of the chicken will increase when you marinate them for a longer time like more than 8 hours to 24 hours which I am not a big of it. I just use to marinate maximum up-to 4 hours in the fridge and then cook it.


INGREDIENTS:

  • Chicken Drumstick – 4 Pieces
  • Thick curd / hung curd – 1 Cup
  • Tumeric Powder – 1/2 Tsp
  • Chilli Powder – 2 Tbsp
  • Garam Masala – 1/ Tsp
  • Amchur Powder – 1 Tsp
  • Salt – as required
  • Lemon Juice – 2 Tsp.

DIRECTION:

  1. Take a large bowl, add in all the above said ingredients and mix thoroughly with a whisk.
  2. Make 3-4 slit in the chicken drumstick. Add in them to the marination and coat it well.
  3. Just cover the bowl with a lid or with the cling wrap. Rest the marination in the refrigerator for about 2- 4 hours.
  4. Pre heat the oven to 220 degree Celsius  for 15 minutes.
  5. Now leave in the chicken drumstick on the grill plate, with the tin below covered with aluminium foil, so that the juice from the chicken not spoil the Oven.
  6. Cook it for about 40 – 45 minutes at 220 degrees.
  7. In between after each 15 minutes turn the chicken pieces so that it cooks evenly.

NOTE:

  1. When you place the chicken do not pour or coat the left over marination mix.
  2. Do not cover the chicken with excess marination, which will lead the marination to struck to the chicken without cooking.

Peach Jam

Hola a todos!!! I always wish to make jam in home, but every time I end up buying it front the famous brand. But still I am always inclined and fascinated by the home made jams. So here I got a chance to make the jam which was my very first sweet I made after moving back to Australia. We lived in an AirBnB and the host had a big peach tree in his backyard. The time we arrives was the perfect time to witness all the peaches and we end up eating it everyday for breakfast. One day I was telling my host that why not you prepare jam out of these fruits so that you can feed you kid with a preservative free and home made organic jam. He came up with an offer for me to prepare the jam, as usual I jumped into the kitchen and made the first batch. Then ended up making batch after batch until the peach season is over which was distributed to my host sisters house and everyone fell in love with it. Here goes the recipe which you will eventually fall in love once you taste it. Absolute pure gold with the look 🙂


INGREDIENTS

  • Peach fruit – 1 Kg (pureed)
  • Sugar – 500- 750 Gms
  • Lemon juice – 2 Tsp

DIRECTIONS

  1. Peel the skin of the peach and cut it into small pieces.
  2. Pure the fruit, if there are bits and pieces it is completely fine.
  3. Take a heavy bottomed kadai or a sause pan, pour in the pure. Simmer the stove.
  4. Bring it to boil and then add the sugar based on the sweetness of the fruit, keep string without a gap. (some peaches will have natural sweetness so it is mandate to adjust accordingly).
  5. Boil it until the sugar is dissolved completely and add in the lemon juice and stir continuously.
  6. Once the consistency reaches the setting point, remove it from the stove and allow it to cool.
  7. Transfer it to a glass jar and store it in the fridge.

NOTE:

To check the jam consistency, once after the sugar is dissolved completely, dip in the spoon and try to clear it with your finger at the back of it, then the spoon should be clean wipe. Tadah!! your jam is ready.

Chicken Gravy – for Beginners

Hola a todos!!! It’s been a long time I came to this place to register my recipe to share with you all. I have completely relocated from India and now starting my new kitchen setup in Sydney, Australia. So from now on the recipes would come from my new kitchen 🙂 which I am very happy to share with each one of you. I have collected very few dishes with nice photographs which I can share, I promise everyone I will never leave this big gap for the second time.

Here goes the easy peasy chicken gravy which can be prepared in 15-20 mins of time. This goes very well with plain basmati rice, roti or even dosa. This recipe is basically for the beginners who are new into the kitchen and those who started to cook the non veg recipes. This will be a good dish that can be packed in the lunch box for kids and adults.

I have specifically used the breast piece of the chicken in this recipe, as it will take less time to cook rather than using the drumstick or any other part of the chicken. Let’s jump into the recipe now.


INGREDIENTS

  • Chicken (breast piece) – 500 Gms
  • Big onions  – 2 No (finely chopped)
  • Tomatoes – 2 No (finely chopped)
  • Ginger Garlic paste – 1 Tsp
  • Garam Masala – 1 Tsp
  • Cumin Powder – 1/2 Tsp
  • Turmeric Powder – 1/2 Tsp
  • Chilli Powder – 1 Tsp
  • Coriander Powder – 2 Tbsp
  • Chicken Masala (Shakthi Masala) – 2 Tbsp
  • Cinnamon stick – small one
  • Clove – one
  • Bay leaf – one
  • Dry Red Chilli – one
  • Oil – 2 Tbsp
  • Butter –  2 Tbsp
  • Salt

DIRECTION

  1. Take a wide wok, add oil and butter. Wait until the butter is melted completely.
  2. Add in the cinnamon stick, clove, Bay lead and dry red chilli. Just saute for a minute.
  3. Now add in the finely chopped onions, add a pinch of salt so that the onions cook fast.
  4. Once the onions started to turn golden color, add in the ginger garlic paste and saute for a two minutes.
  5. Now add in the finely chopped tomatoes and add a pinch of salt to it. Saute it till the tomatoes are mushy.
  6. Next step is to add in all the masala powders (garam masala, cumin powder, turmeric powder, chilli powder, coriander powder and chicken masala.
  7. Add the required salt and saute it until the oil oozes out of this mixture.
  8. Now add in the chicken pieces, close the wok for 2 minutes or until the chicken leaves out the water.
  9. Now add 500 ml of water and close the lid for about 8 minutes, after that check for the chicken whether it is cooked and keep the lid open for the gravy to thicken a little.
  10. Finally garnish with some coriander leaves and serve it with hot rice.

NOTE

  • Chicken breast piece should not be cooked more than 12 – 15 minutes as it will loose its tenderness.
  • If you are using the drumstick(leg piece) it needs to be cooked for 45 minutes with the lid and the water quantity needs to be increased accordingly.

WholeWheat Garlic Butter Tandoori Roti

Welcome back to my page. A lot of us usually prefer to have tandoori roti on a road side dhabba with a dash of butter and garlic to it, accompanied with a awesome butter chicken or paneer butter masala. This combination will never go failed. But after moving out of the country, having tandoori roti is very rare. I was longing to eat it and one evening I asked Š, whether he can help me in some technical stuff that I am planning to do in the kitchen. He readily accepted as he knew something yummy is getting cooked in the kitchen.

Never go to the dhabba for the tandoori roti when we have the same texture and same taste with fully home made roti.


INGREDIENTS

  • Whole Wheat flour – 2 cups
  • Milk (full fat) – 1/2 – 1 cup
  • Oil – 1 Tbsp
  • Salt – 1 Tsp
  • Butter – 2 Tbsp
  • Garlic (finely chopped) – 3 Tbsp
  • Coriander leave (finely chopped) – 1 Tbsp
  • White Sesame Seeds – 1 Tsp (optional)

DIRECTION

  1. Take a wide bowl, add in the flour, oil and salt. Mix it well 
  2. Add in the milk slowly, little by little and knead the dough until soft.
  3. Now take the fully kneaded dough on to the work bench and start kneading it push and pull method.
  4. Knead thoroughly for 10 minutes to get a soft dough. Rest the dough for 30 minutes.
  5. Make an equal size balls and start rolling it. Do not make a thin roti as it will not be like the restaurant style. Make a thick roti which is about 2-3 mm thick.
  6. Now heat the tawa, apply water on one side of the roti with your hand and place it on the tawa.
  7. So when it starts getting the bubble, just turn the tawa and show the roti directly on to the stove.
  8. The roti will not fall of if you have applied enough water on it .
  9. So keep watching whether the roti is cooked well and take it out from the tawa with the tong.
  10. Now mix half melted butter, garlic and coriander leave together. Apply it on the hot roti with a brush.
  11. This step is option. Just add some sesame seeds to the top and serve it hot.

Kitchen Storage Idea

Hello to my buddies out there. I am always fascinated with organizing my kitchen. Before I get married, I used to help my mom in organizing the kitchen in my house. But my mom is never used to glass or ceramic storage finally ended up with the Stainless Steel contained and few with food grade plastic containers. But I am always attracted towards using the glass jars and ceramic jars. So when I got married to S, we started hunting for those and we finally set up my kitchen the way I wanted to be. So here are the few types of containers I will show in the images here for storage of groceries, spices, oil, and miscellaneous items.

I will post the picture of my small kitchen which I have organized a couple of years back and still looks the same.  I use the stainless steel jar for storing homemade ghee as I used to reheat it every day for adding in hot dosas.

GROCERY ITEMS:

When it comes to groceries, I always prefer to use the transparent glass jars, because we need to know the quantity of the item as we open our racks, else we will end up searching each box when we are in a hurry to rush to the store.

TIPS:

  • When you buy these kinds of glass jars, do buy a few of them in extra. Because we may break during handling so in order to replace some extra jars are always needed to make them look similar.
  • I prefer to buy with the fiber or plastic lid because as days pass on the stainless steel ones tend to form rust.
  • I do not wash these jars often, but before I refill them with the new stock, I used to clean it with a damp cloth and keep it in the sunlight. This helps in breakage :P.


You can use the stainless steel container too, but you need to label them to know what is inside what. Also, as I mentioned above you will end up with checking each box before running to the grocery store.

OIL CANS:

I do prefer to buy in the glass, because the glass oil cans will keep away from dripping or spilling. Also when you store the glass jars you can keep it inside a tray to avoid the countertop getting greased due to some oil spilling. Again, not the preference of stainless steel due to the rust formation.

TIPS:

  • To clean the oil can, first, clean it will liquid soap. Then take a tablespoon of Baking Soda and fill half the bottle with water plus vinegar. Leave it for a few mins and wash it. Excess oil and grease will be removed.
  • Do not wash with hot water as glass may break with the temperature of the bottle.


SPICE BOX:

There are different types of spice box available in the market. Some may be like stacking the jars or some may like to keep the rotating spice rack on the countertop. You can buy it as per your choice.


NUTS JARS:

When we pack the nuts, it needs to be kept in an airtight container. SO I prefer to store it in the small mason jars with the airtight lid or with the airtight locks.


NOTES:

  • I do not post the original pictures here all are references from google, but these are the affordable ones. There are no luxury products here listed in the pics.
  • You can buy as a lot from the seller online or during some offers in the stores and organize your pantry.
  • These glass jars will be cheaper than the stainless steel ones which you get in India.


Way to healthy baking

Hi buddies!! This post is just to let you know the effect of transforming into healthy baking. What are the changes we need to make to choose healthy baking and ingredient we need to omit? But there are some things still which cannot be really taken off from few recipes, to attain the better taste and texture. What is the big deal with that, let’s promote healthy baking and stay healthy rather than waiting for the better taste. I am not an expert, so I may sound wrong sometime and I may miss a few things. If so please do comment or send an email so that I will be more happy to work upon those.

Let me first list our few of the ingredients that are not a part of healthy baking. There may be lots of other ingredients too, but I am listing the commonly known/used products that are to be avoided.

  • Maida/All Purpose Flour
  • Sugar
  • Baking soda/Baking Powder
  • Food Color
  • Artificial Flavors

I started baking on my own and the very first cake I made is whole wheat chocolate cake and that was in the electric rice cooker. I never prefer maida in any of my cake and cookie bakes. Here goes the replacement for the above ingredient to make our bakes a perfectly healthy and guilt free. 

FLOUR:

 There are lots of other different flour which we use in our home, but as the store makes the cakes and baked with maida /refined flour, we follow the same. Let’s change this with the below ones.

  • Whole Wheat Flour (flour from the grounded wheat from the mill/ Store Bought)
  • Finger millet/Ragi Flour
  • Pearl Millet Flour /Bajra / Kambu flour
  • Homemade Millet Flour
  • Almond Flour
  • Coconut Flour

SUGAR:

The white sugar is obtained after a chemical process from the raw juice of sugarcane. It undergoes a bleaching process and a lot of sugar industries use bone char derived from cows. Sorry Vegans!!!! But these particles are not found in the sugar, but then they come in contact with sugar. Hence we can switch to use the alternatives as below and yes these are now readily available in the market. Please do buy it from a good organic store to buy the native ones and the trusted quality.

  • Cane Sugar / Natu Sarkarai
  • Jaggery / Vellam
  • Palm Jaggery / Karupatti
  • Coconut Sugar
  • Mountain Honey / Malai thean

RAISING AGENT:

Most of the cake recipes call in for the raising agent, there is an option to completely cut down it from our cake bakes. Please do buy high-quality aluminum-free baking powder, as these are available in markets readily now. When the recipe calls in for 1/2 Tsp of these ingredients you can reduce it to 1/4 Tsp. There is no big difference when you try that.  (I will post the recipe with no BP and BS for the cakes and show the difference of it)Also, whenever we make cookies these ingredients can be completely left out. So that they are completely safe for kids. 

FOOD COLOR:

There is no proper result that the food color is causing cancer when I researched a few of the articles. (Please do leave in comments if you have come across any.)  But I am trying to mostly use the natural food color in my bakes. We can make food color from the veggies which we use. They can be made in powder form or even in liquid form. Here I will list a few of the veggies and the color you will get from it. 

Veggies/FruitsColor
Pure Pomegranate JuiceRed
Parsley JuiceGreen
Pure Beetroot JuiceRed
Pure Carrot JuiceOrange
Blueberry JuiceVioletish Blue
Strawberry JuicePale Pink to Dark Pink

Veggies /FruitsColor
Beetroot PowderRed
Carrot PowderOrange
Matcha PowderPale Green
Turmeric PowderYellow
Cocoa PowderBrown
SaffronOrangish Red

Spinach Powder

Green


Please do leave in the comments if you have any questions regarding Healthy Baking!!! 

You don’t have to cook fancy or complicated, just good food from fresh ingredients!!!

Happy Baking you all!!!!

Convection Oven Usage

Hello everyone!!! I want to write a post on the usage of a convection oven for a long time. There are different types of the oven in the market.


This post is not sponsored for any product I mentioned here and not a promotional post.


  1. Microwave
    • They are mainly used for reheating the food with the heat waves
  2. OTG
    • As the name says it is used as Oven, Toaster, and Grill. It primarily serves baking as the purpose.
  3. Convection Oven 
    • This is the Mix of both microwave and OTG. So this can be used to reheat the food and also for baking and Grill.

I am using the convection oven for more than two years and it gives me awesome result whenever I bake. So here is how to use the convection oven for baking cakes, bread, muffins, cookies and what not.

I use IFB convection oven bought it online, the same was used by my mom for more than three years before. It serves all the purpose which we need. Here I will explain how to use it for baking all the goodies.

CAKES:

  1. Preheat the oven in convection mode with 160 degrees.
  2. Once the preheat is done, then place the cake tin into the oven and bake it for 25 mins. (using 6″ pan)
  3. If you use  8″ pan and more batter is into it then bake for about 30 -35 mins.
  4. Always check the cake with the skewer or toothpick. It should come out clean.
  5. If not clean and already baked on the top, cover the tin with aluminum foil and bake for about 5 mins.
  6. If still not done but there is a brown crust on top, there is really something wrong with the measurement used.

MUFFINS:

  1. Preheat the oven in convection mode with 160 degrees.
  2. Once the preheat is done, then place the muffin tray into the oven and bake it for 16 – 20 mins.
  3. Always check one of them with the skewer or toothpick. It should come out clean.
  4. If not clean and already baked on the top, cover the tin with aluminum foil and bake for about 5 mins.
  5. If still not done but there is a brown crust on top, there is really something wrong with the measurement used.

COOKIES:

  1. Preheat the oven in convection mode with 160 degrees.
  2. Once the preheat is done, then place the cookie tray into the oven and bake it for 12 -14 mins for the chewy cookies.
  3. bake it for 15 mins for the crunchy cookies.
  4. The cookie will be soft and fragile while we take it out from the oven.
  5. Once cooled on the rack it will get back to its original texture.


I will update this post with pizza, garlic bread, and other baked goodies temperatures as and when I try them and get a thumbs-up from my wellwishers.

Until then ‘Happy Baking!!! :)’.


Kitchen Guide

Hola a todos!!! Welcome to the newcomer’s guide. This post is completely written for the newly married couples who want to set up their kitchen and how/what are the groceries that need to be bought. I have been now married for more than 2 years, my passion for the home organization is equally proportional to my passion for cooking and baking.

I will elaborate on how to set up a new kitchen with groceries and other essential utensils with the version of glassware/ceramic and stainless steel for those who prefer. I will suggest a minimal requirement for the new kitchen setup yet all essentials will be covered in the list. What we are waiting for, let’s get started with the organization for a family of two to four.

All the essential things to be bought will be mainly focused in Chennai, Tamil Nadu, India.

This is not a sponsored post for any shops and products.

Initially, the best place to buy the groceries are Big Bazar, so far I have found the quality they provide is really good and I did not feel any discomfort. I am sure that you will not be able to find few items sometimes due to out of stock so just keep the track of items to buy from other stores.

Let me first start with the utensils list, followed by groceries, storage containers and finally to the organization. Also if anyone needs to know how to organize their kitchen, please so send me the images so that I can guide them to renovate it.

vessels1


grocery list

misselaneous thijs

Easy Tiffin Sambhar

This recipe is my version of easy peasy sambhar. This will go well with dosa rather than idlis. Whenever I have leftover dhal from my lunch, my dinner is sorted without a second thought. It is not mandatory that we need to make this with the leftover dhal, fresh dhal can also be used. It will get ready in 10 -15 mins by the time we make dosas.


INGREDIENTS:

  • Cooked Dhal – 1 Cup
  • Small Onions /Shallots – 15 No
  • Tomato – 1 No (large)
  • Sambhar Powder – 3 Tsp
  • Salt – to taste
  • Oil – 1 Tsp
  • Water – Required consistency

For Tempering

  • Oil – 1 Tsp
  • Mustard Seeds – 1 Tsp
  • Curry Leaves – 2 Strands
  • Hing / Asafoetida – 1/2 Tsp
  • Dry Red Chili / Green Chili – 3/4 No

DIRECTION:

  1. Heat the kadai (I use clay pot) and add oil.
  2. Once it is hot add onions and tomatoes saute well.
  3. Now add cooked dhal and 1/2 – 3/4 cup water.
  4. Make the tempering in another tadka pan by adding oil, mustard seeds, Hing, curry leaves, and dry chili.
  5. Once the mustard seeds start crackling add it to the dhal in the pot.
  6. Adjust salt and serve with hot dosas.

NOTES:

  • Dhal is cooked by adding turmeric powder and garlic.
  • While cooking dhal you can add one drop of castor oil to it to remove the gastric ability in it.

Mango Semolina Cake

I made this cake way back in 2018 during the mango season. My insta page and other groups and blogs were flooded with the mango cake or tarts and everything possible with mangoes. I am an ardent lover of mango and use to try all different varieties of mangoes available in the farmer’s market.

In S’s farm, we get two different varieties of mangoes and I never leave s single season without tasting those from the farms. This is the first time I have actually tried a semolina cake that too with mangoes. It was actually an easy to go recipe which I tried and its a basic cake recipe.

32984752_1797529150315011_7057820973268992000_n

I kept on hogging this cake after every meal and S was like, do you like the mango cake or you are eating this for the sake of mangoes. Actually, it’s both. The smell of the cake and the texture wow I loved it.


INGREDIENTS:

  • Rava/Semolina – 1 Cup
  • Mango Puree – 1 Cup (do not add water)
  • Brown Sugar – 1/2 Cup
  • Oil – 1/4 Cup
  • Baking Powder – 1/2 Tsp

DIRECTION:

  1. Preheat the oven to 160 degrees. Line a 6-inch baking tray with parchment paper.
  2. Combine the semolina with sugar and baking powder.
  3. Mix with oil and finally add the mango puree. Let this mix sit for abt 10 mins on the counter or until the puree is absorbed by the rava.
  4. Transfer the batter into a baking tray.
  5. Bake it for 25 – 30 mins at 160 degrees or until the skewer comes out clean.
  6. If it is overbaked or the temperature is high it will form a crust at the top
  7. Transfer it to the cake rack, cool it and serve.

NOTES

  • If you use white sugar the color of the mango will be maintained in the cake.
  • I do not like to add any nuts or raisin here for this cake.
  • Taste the mango before making the puree, mainly Alphonso will be a good combination for the cake.
  • You can add 3/4 cup of sugar if you like sweet more, I always prefer less sweetness in my cakes.
  • If you use canned mangoes reduce the sugar to 1/4 cup.